The Bank Reconciliation module is also sometimes referred to as Bank Rec or Cash Management and it is part of the Financial series in Dynamics GP. The menu choices for Bank Reconciliation will start with Financial, while the SQL tables will start with CM. Setup for the Bank Reconciliation module consists of two steps—setting up Checkbooks and Bank Reconciliation Setup.
Even if you do not own or are not planning on
using the Bank Reconciliation module, you will need to perform the
checkbook setup in Dynamics GP. This will be used in many other modules
throughout the system.
Checkbooks
A Checkbook in
Dynamics GP represents a bank account. In a typical company, each
individual bank account will have a unique General Ledger account. The
Dynamics GP checkbook setup will allow you to link each bank account to a
GL account and keep track of the next available check and deposit
numbers for the bank account. Most modules in Dynamics GP use a
Checkbook ID (as opposed to the GL account number) to represent a bank
account.
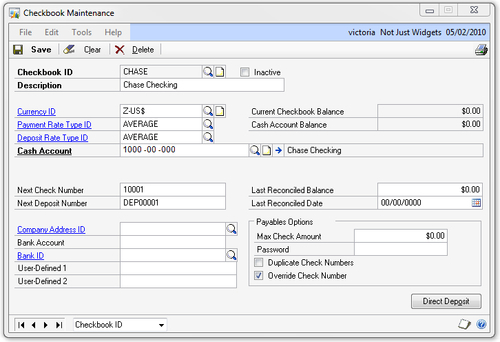
You can create an unlimited number of checkbooks in Dynamics GP. To set up or modify a checkbook, navigate to Cards | Financial | Checkbook. Following are explanations for the fields on the Checkbook Maintenance window:
Checkbook ID: The Checkbook ID is
alphanumeric (up to 15 characters) and will be used throughout Dynamics
GP to identify a bank account. It is recommended to make this ID
something easy for users to identify. For example, if you have multiple
accounts with the same bank, consider what users typically call them.
The IDs might represent their names such as CHASE CHECKING and CHASE SAVINGS, or maybe contain part of the account number such as CHASE 1833 and CHASE 5869. Once created, the Checkbook ID cannot be changed without the purchase of an additional tool.
Description: The name of the bank
account and what will help users identify the correct bank account in a
list if the Checkbook ID is not enough. This will allow up to 30
characters. If there are multiple similar accounts, consider putting the
account number, or part of it, into the description, especially if it
is not part of the Checkbook ID.
Inactive: Once a bank account is no
longer used, you can make it inactive to prevent users from entering
transactions to it. Inactive checkbooks still show up on inquiries, but
attempting to enter a transaction for one will result in an error.
Currency ID, Payment Rate Type, and Deposit Rate Type: Choose the appropriate currency and rate types for the bank account.
Cash Account: The GL account
corresponding to this bank account. It is important to have a one-to-one
relationship between bank accounts and GL accounts to allow for smooth
bank reconciliations.
Next Check Number: Enter the next
check number you will be using. Dynamics GP will automatically increment
check numbers as checks are printed or entered in various modules. Note
that you will need to manually increment the number of digits. For
example, if you have set up the check number with four digits, once you
reach 9999, the system will not automatically go to 10000, it will update to 0000.
While you can add more digits at any time, this will not update check
numbers that have already been used, so your check numbers will have
different lengths and may not sort properly on lookups or reports.
Consider entering an extra zero or two in front of the numbers at the
onset, so if your next check number is 6001, you could start with 06001 or 006001, depending on the expected volume of checks.
Next Deposit Number: Enter the next
deposit number you would like to use. Typically deposit slips are not
numbered, so this is more of an internal number. Many companies like to
use the prefix DEP to clearly identify deposits on a list of
bank transactions. As with the check numbers, the deposit numbers will
not automatically increment the number of digits, so it is recommended
to use a number with enough total digits to last for some time.
Company Address ID, Bank Account, and Bank ID: These fields are optional and, unless needed by other modules, most companies typically leave these blank.
User-Defined 1 and 2:
If there is additional information you would like to track about your
bank account, you can use these two fields. The labels for these can be
changed on the Bank Reconciliation Setup window (Microsoft Dynamics GP | Tools | Setup | Financial | Bank Reconciliation).
Last Reconciled Balance and Date:
These are used to populate your last reconciliation information prior
to starting to use Dynamics GP Bank Reconciliation. You can leave these
blank until you are ready to perform your first bank reconciliation.
Payables Options:
Max Check Amount and Password:
With these you can limit the maximum amount for payables checks and
optionally set up a password to override the maximum. Leaving the amount
at zero will allow checks of any amount to be created.
Duplicate Check Numbers: It is
recommended to uncheck (disallow) this option so that duplicate check
numbers are not inadvertently entered, thus causing problems during bank
reconciliation.
Override Check Number: Usually it is
helpful to leave this checked (allowed), so that when payables checks
are printed, the user can override the next check number if for some
reason it is not coming up correctly.
The following is an example of a typical Checkbook Maintenance window:
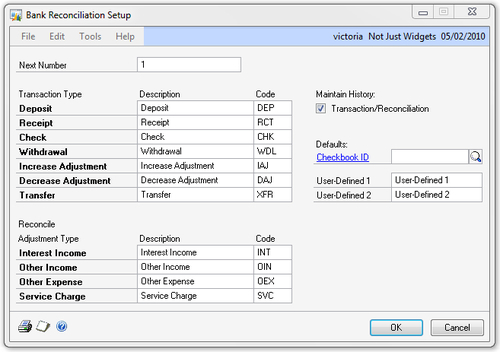
Bank Reconciliation Setup
Bank Reconciliation setup determines the defaults for
the Bank Reconciliation module. If you are not using the Bank
Reconciliation module, or not implementing it yet, you can skip this
step. To open the Bank Reconciliation Setup window, navigate to Microsoft Dynamics GP | Tools | Setup | Financial | Bank Reconciliation. The following list explains the fields on this window:
Next Number: This will be the next
number used on a bank transaction or bank transfer. This is an internal
number and there is typically no reason to change this from the default;
it will increment automatically as needed.
Transaction Type, Description, and Code:
These are default descriptions and codes assigned to each type of Bank
Reconciliation transaction. It is recommended not to change these
descriptions and codes, as having them differ from the defaults will
make it difficult to consult with others about any questions you might
have on the Bank Reconciliation module.
Reconcile Adjustment Type, Description, and Code:
Similar to the previous option, these are descriptions and codes
assigned to Bank Reconciliation adjustments and changing them is not
recommended.
Maintain History: This is checked by default, it is recommended to leave it selected and keep all history.
Defaults:
Checkbook ID: Optionally, you can
specify a default Checkbook ID for your Bank Reconciliation
transactions. This may save time during data entry if most bank
transactions use the same bank account. Checkbooks have to be set up
first to be able to select them as a default. If there are many
checkbooks being used, consider leaving this default blank to force
users to pick a checkbook for each transaction. Note that if the
Multicurrency module is enabled, most Dynamics GP windows will not use
this checkbook ID default.
User-Defined 1 and 2: This field allows you to change the labels that appear for the user-defined fields on the Checkbook Maintenance window.
The following screenshot shows the Bank Reconciliation Setup window: